A Senior's Complete Guide to Using a Single Crutch
Got a new crutch? It might feel awkward, but it's a tool to get you moving safely. This guide covers the basics, how to fit your crutch, walk correctly, and handle stairs without wiping out.
Why Just One Crutch?
Your New Support Stick
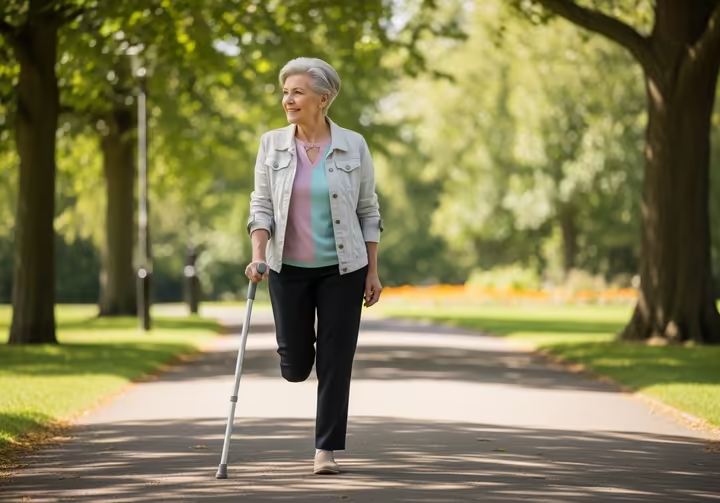
A crutch is a temporary tool. It gives you support, protects your body while it heals, and helps you move around safely. 1 Using one crutch is a step up from needing a walker or two crutches, and it's a step closer to walking on your own again. 3
The Doctor's Orders
Doctors prescribe a single crutch when you need less support than a walker or two crutches. It's for when you're cleared for "partial weight-bearing." This means you can put some weight on your weaker leg, but not all of it. 4
This is common after hip or knee replacements, or for managing arthritis pain. 6, 1 It's also helpful if you have weakness or balance issues on one side of your body, like after a stroke. 1 The crutch takes some weight off your bad leg and gives you a wider, more stable base to stand on. 8
When Can I Ditch This Thing?
Everyone wants to know, "How long do I need this?" Don't rush it. Deciding when to stop is a team decision with your doctor and physical therapist. 10 Stopping too soon can delay healing, cause a new injury, or even damage recent surgery. 10
Your therapist looks for a few key signs, less pain, better leg and hip strength, and stable balance. 12 They'll also check that you can walk without a major limp. The process is often gradual, called 'weaning,' where you use it less and less over time. 14, 16 Listen to them, they know the safest way to get you walking on your own.
Underarm vs. Forearm Crutches
You'll likely get one of two types, an underarm crutch or a forearm crutch. They do the same job but are built differently. Knowing the difference helps you and your doctor pick the right one for you.
The Parts of a Crutch
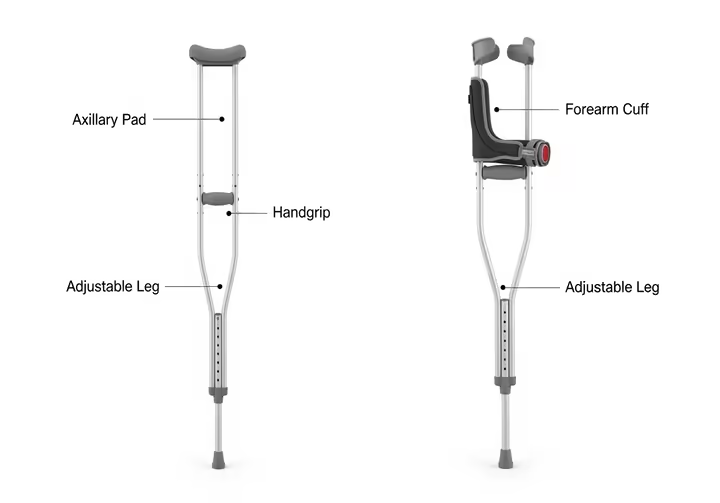
The underarm crutch (or axillary crutch) is the one you probably picture. The padded part at the top is the axillary pad. 17 You don't lean on this part. Below that, two posts lead down to a single handgrip, which is where you support your body's weight. 9 These posts join into a single adjustable leg, which has a non-slip rubber tip, or ferrule, at the bottom for traction. 17
The forearm crutch (also called a Lofstrand or elbow crutch) looks different. It has an open plastic or metal forearm cuff that goes around your arm just below the elbow. 9 The cuff helps keep the crutch on your arm, so you can use your hands without dropping it. Below the cuff is the handgrip, and like the underarm crutch, it has an adjustable leg with a rubber tip. 19
Underarm Crutches (Axillary)
These are common in the U.S., especially for short-term use after an injury or surgery. 20 For many seniors, they seem easier to learn and require less upper body strength. 22 A first-time user might feel more stable with them.
But there are big downsides. The biggest danger is "crutch palsy," nerve damage in your armpit from leaning on the pads. 8 This is serious, it can cause numbness, tingling, or weakness in your arm and hand. Underarm crutches are also bulky and can make your hands, wrists, and ribs sore. 22
Forearm Crutches (Lofstrand)
These are standard for long-term users and are more common in Europe. 21 They have a big advantage, no underarm pad means no risk of crutch palsy. 26 Many people find they encourage better posture, which reduces back strain, and they're less bulky in tight spaces. 21, 22
For seniors with arthritis, forearm crutches are often a good choice. You can find them with ergonomic handgrips that spread pressure across your palm to reduce wrist strain. 22 The main catch is that they require more upper body strength and coordination to learn. 8
Sometimes the crutch you get is based on habit, not your needs. 21 Don't be afraid to talk to your doctor or physical therapist. If you have arthritis or are worried about the risks of underarm crutches, ask if a forearm crutch is a better option.
| Feature | Underarm (Axillary) Crutch | Forearm (Lofstrand) Crutch |
|---|---|---|
| Best For | Short-term recovery (post-surgery) 20 | Long-term or permanent conditions 20 |
| Upper Body Strength | Requires less 22 | Requires more 22 |
| Stability | Feels more stable at first 23 | Better on uneven ground and stairs 22 |
| Ease of Learning | Easier to learn 22 | Takes more practice 22 |
| Risk of Nerve Damage | High risk of "crutch palsy" if used wrong 24 | No risk of armpit nerve damage 26 |
| Good for Arthritis? | Can cause hand and wrist pain 22 | Often better, especially with ergonomic handles 22 |
| Navigating Stairs | Can be bulky and difficult 21 | Generally easier to manage 22 |
Getting the Right Fit
Why Fit Is Everything
Before you take a single step, your crutch must be fitted to your body. Getting the fit right is the most important safety step. A crutch that's too tall or too short can cause falls, back pain, or nerve damage. 24
A physical therapist should do the first fitting. But you need to know how to check it at home, since you might need to adjust it when you change shoes. 28 Always wear your normal walking shoes when adjusting your crutch. 29
Fitting an Underarm Crutch
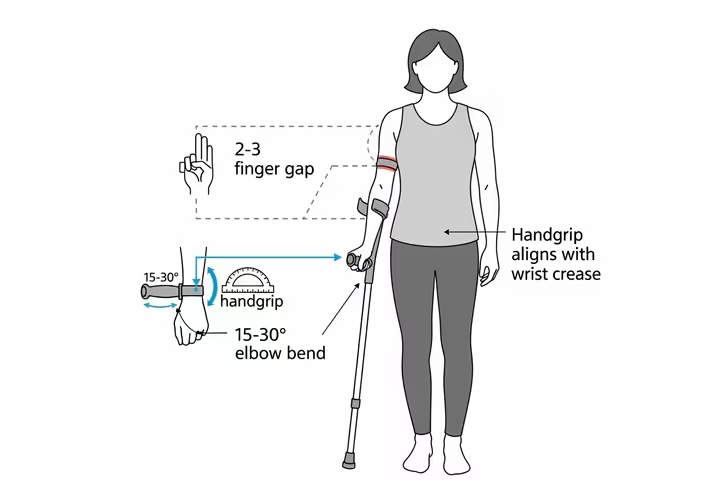
To size your crutch, stand up straight. Put the crutch tip on the floor about 4 to 6 inches to the side and front of your foot. 30 Relax your shoulder. You should be able to slide two or three fingers between the top pad and your armpit. 11
This gap is vital. You must never rest your body weight on the underarm pads. All your weight goes through your hands on the handgrips. Leaning on the pads can cause "crutch palsy" by pinching the nerves and blood vessels in your armpit. 4
Next, adjust the handgrip. Let your arm hang loosely at your side, the top of the handgrip should line up with the crease of your wrist. 11 When you grip it, your elbow should have a slight bend, about 15 to 30 degrees. 33 This bend lets you push down properly and acts like a shock absorber.
Fitting a Forearm Crutch
The handgrip height is adjusted the same way. Stand tall with your arm relaxed at your side, and adjust the crutch until the handgrip is level with your wrist crease. 35 This should give you the same 15 to 30 degree elbow bend when you hold the handle. 35
Next, adjust the forearm cuff. The cuff should sit on the thickest part of your forearm, about one to two inches below your elbow. 35 This gives you support without getting in the way when you bend your arm. 36 The cuff should be snug enough not to slide, but loose enough not to pinch.
How to Walk (The Right Way)
Now that your crutch fits, you're ready to walk. It feels weird at first, but the rhythm is simple. Be patient and practice in a clear, open space.
The Single Most Important Rule: Crutch on the Opposite Side
This is the big one, and it might feel backward at first. Always hold the crutch in the hand on your stronger side... the side opposite your injured or weaker leg. 3 So, if your left leg is weak, you hold the crutch in your right hand.
You'll want to put the crutch next to your bad leg, but don't. Using it on the opposite side helps you walk more naturally. 3 It also creates a wide, stable triangle between the crutch and your feet, which keeps you from tipping over. 38
The Two-Step Rhythm
Walking is a simple "one-two" rhythm that will start to feel normal pretty quickly.
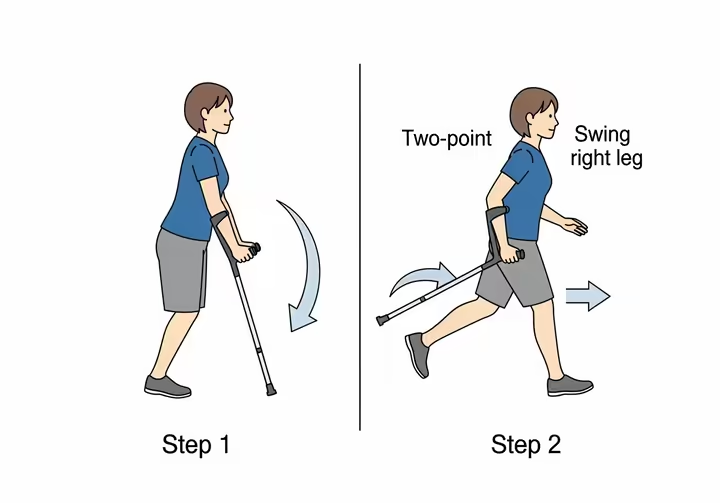
First, stand straight and get your balance. Step ONE is moving two things together, your crutch and your weaker leg. Move them forward at the same time, about the length of a normal step. 10
Step TWO is for your strong leg. Push down on the crutch's handgrip to take some weight, and swing your stronger leg forward. Land it just ahead of the crutch. 3 Pause to feel stable, then repeat. One, crutch and weak leg. Two, strong leg.
Tackling Everyday Obstacles
Once you're good on flat ground, it's time to handle real-world obstacles. Stairs, chairs, and doors can seem scary. The trick is to move slowly and think ahead.
Stairs: "Up with the Good, Down with the Bad"
Here's a phrase to remember for stairs, "Up with the good, and down with the bad." 2 This little jingle helps you remember the right sequence so your strong leg does the heavy lifting.
To go up stairs, always use a handrail if there is one. 41 Hold the rail with one hand and the crutch in the other. Now, "up with the good." Push down on the rail and crutch, and step up with your strong leg. Once that foot is secure, bring your weaker leg and the crutch up to meet it on the same step. 6
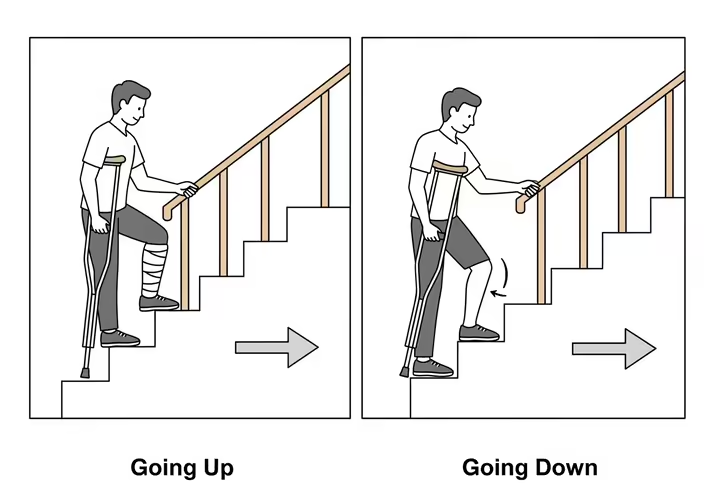
To go down stairs, you reverse it, "down with the bad." Hold the rail and crutch for support. First, move your crutch and your weaker leg down to the step below you. Then, slowly and carefully bring your strong leg down to the same step. 41
Curbs and Ramps
A curb is just a single stair, so the same rule applies. To go up a curb, lead with your "good" (strong) leg. To step down, lead with your "bad" (weak) leg and your crutch. 40
On ramps, stay in control. Going up, you might lean forward and take smaller steps. Going down, keep the crutch slightly ahead of you and use short steps so you don't build up too much speed. 2
Getting In and Out of Chairs
To sit down safely, back up to a sturdy chair (one with armrests is best) until you feel the seat against your legs. 4 Hold your crutch in the hand on your weaker side. With your other hand free, reach back and grab the chair's armrest. With one hand on the crutch and the other on the armrest, you can slowly lower yourself down. 2
To stand up, just reverse it. Scoot to the edge of the chair and plant your strong foot on the floor. Hold the crutch in the hand on your weak side, and put your other hand on the armrest. Push up with both your arm and your strong leg. 2 Get your balance before moving the crutch back to your strong side to walk.
Doors and Carrying Stuff
Simple things are now a challenge. For doors, it's usually easier to push them open by leaning into them than to pull. 44 For a pull door, stand to the side, pull it open wide, and use the tip of your crutch to hold it open while you go through. 44
For carrying things, the rule is, keep your hands free. Use a backpack, a cross-body bag, or a fanny pack for your phone, keys, or water bottle. 11 This keeps one hand on your crutch and the other free for balance or opening doors.
Critical Safety Rules
As you get used to your crutch, you'll have questions. Getting the right answers is key to staying safe.
Critical Clarification: A Single Crutch is NOT for "Non-Weight-Bearing"
This is maybe the most important point here. If your doctor says you are "non-weight-bearing" (NWB), that means ZERO weight on your injured leg. 5 You must keep that foot off the ground completely.
If you are non-weight-bearing, using a single crutch is extremely dangerous. One point of support isn't enough to hold your full body weight while hopping on one leg. 4 For non-weight-bearing, you must use two crutches or a walker to stay safe. 48 There are no exceptions to this rule.
What About Hands-Free Crutches?
You might see other mobility aids online, like hands-free crutches (the iWALK or Freedom Leg). 49 These devices strap to your leg, letting you rest your shin on a platform while your hands and arms are free. 51 They are great tools, but they are designed for specific, below-the-knee injuries like a broken ankle. They are usually not right for someone recovering from hip or knee surgery, or for general weakness. 50
Knee scooters are similar, you kneel on them with one leg and push with the other. Again, these are for below-the-knee injuries. Trust the aid your doctor recommended, it was chosen for your specific medical needs.
Getting Ready
Success with a crutch also depends on preparing your home and your body. A little prep work makes a huge difference.
Make Your Home Crutch-Friendly
Your home has new hazards now. Ask a friend or family member to help you safety-proof it.
Clear your pathways of all trip hazards. This is the most important step. Get rid of throw rugs, or tape them down securely. 52 Tuck away or tape down any loose electrical cords. 11 Make sure your hallways and rooms are well-lit, especially the path to the bathroom, and use nightlights. 52
The bathroom is a high-risk area for falls. Use non-slip mats in and out of the tub or shower. Have sturdy grab bars installed by the toilet and in the shower. 53 And always watch out for pets or small children who might dart in front of you. 2
Prep Your Upper Body
Using a crutch takes a surprising amount of upper body and core strength. Your arms, shoulders, and back do the work of supporting you. 55 If you have a planned surgery, you can prepare your body ahead of time. A few weeks of simple exercises before your procedure can make recovery much easier. 56
Always talk to your doctor or physical therapist before starting new exercises. They can tell you what's safe for you. Some simple exercises you can often do from a chair include:
- Seated Press-Ups: Sit in a sturdy chair with armrests. Put your palms on the armrests and push down to lift your bottom slightly off the seat. Hold for a few seconds, then lower yourself down. This builds the exact muscles you'll be using. 56
- Bicep Curls and Tricep Extensions: Use light hand weights (or soup cans) to do simple arm exercises while seated. 55
- Seated Core Exercises: Gentle movements like pelvic tilts (rocking your pelvis forward and back) or seated marching can strengthen the core muscles you need for balance. 57

Preparing your home and your body sets you up for a safe and successful recovery. Be patient, move carefully, and celebrate your daily progress.
Works cited
- How To Use Crutches, Canes, and Walkers - OrthoInfo - AAOS, https://orthoinfo.aaos.org/en/recovery/how-to-use-crutches-canes-and-walkers/
- Using Crutches | Senior Health Services | Hartford HealthCare | CT, https://hhcseniorservices.org/health-wellness/health-resources/health-library/detail?id=zt1155
- How to Walk with One Crutch: Safety & Mobility on One Crutch - Cool Crutches, https://www.coolcrutches.com/blogs/news/how-to-walk-with-one-crutch-a-simple-guide-to-safe-and-stylish-mobility
- Crutch Training | Instructions on How to Use Crutches - Washington University Orthopedics, https://www.ortho.wustl.edu/content/Education/3628/Patient-Education/Educational-Materials/How-to-Fit-and-Use-Crutches.aspx
- Weight bearing - Physiopedia, https://www.physio-pedia.com/Weight_bearing
- Hip Replacement Information – My Recovery at Home - Manchester University NHS Foundation Trust, https://mft.nhs.uk/app/uploads/2020/09/My-recovery-at-home-final-hip_V2.pdf
- Crutches for Knee Replacement: Everything You Need to Know, https://kneecrutches.co.uk/crutches-for-knee-replacement-everything-you-need-to-know/
- Crutches - StatPearls - NCBI Bookshelf, https://www.ncbi.nlm.nih.gov/books/NBK539724/
- Crutches - Physiopedia, https://www.physio-pedia.com/Crutches
- How To Use Crutches Correctly - Cleveland Clinic, https://my.clevelandclinic.org/health/treatments/15543-how-to-use-crutches
- Physiotherapy: How to use crutches - MyHealth Alberta, https://myhealth.alberta.ca/Health/Pages/conditions.aspx?hwid=custom.ab_physio_crutches_inst
- Top tips on Crutches Everyone Should Know | Access Rehabilitation Equipment, https://www.accessrehabequip.com.au/blog/57-top-tips-on-crutches-everyone-should-know
- When Can I Use One Crutch After Hip Replacement, https://kneecrutches.co.uk/when-can-i-use-one-crutch-after-hip-replacement/
- CRUTCH WEANING PROTOCOL 4 WEEKS - Colorado Sports Foot & Ankle Specialists, https://sportsfootankle.com/wp-content/uploads/2017/11/4-Week-Wean-Crutches.pdf
- Hip Arthroscopy Post-operative Rehabilitation Protocol, https://med.virginia.edu/orthopaedic-surgery/wp-content/uploads/sites/242/2023/01/Hip-Arthroscopy.pdf
- How to Use Crutches After Hip Surgery - YouTube, https://www.youtube.com/watch?v=jk9ISUFfeh8
- Axillary Crutch MT | PDF | Anatomical Terms Of Motion | Limbs (Anatomy) - Scribd, https://www.scribd.com/presentation/859670537/Axillary-Crutch-MT
- (C1) Axillary Crutch, (C2) Forearm/Elbow Crutch, (C3) Millennial R ⃝... | Download Scientific Diagram - ResearchGate, https://www.researchgate.net/figure/C1-Axillary-Crutch-C2-Forearm-Elbow-Crutch-C3-Millennial-R-In-Motion_fig2_281821079
- Forearm/Lofstrand Crutches - Physical Therapy 101, https://www.physicaltherapy101.net/forearm-lofstrand-crutches/
- What Are the Different Types of Crutches? - Healthline, https://www.healthline.com/health/bone-health/crutches-types
- Forearm vs. underarm crutches - Walk Easy, https://walkeasy.com/blog/walkeasy/forearm-vs-underarm-crutches
- How to Find & Use the Best Crutches to Suit Your Needs in 2025 - Blog by BetterCareMarket, https://www.bettercaremarket.com.au/blog/post/find-the-best-crutches-to-suit-your-needs.html
- Axillary versus Forearm Crutches: A Prospective Cohort Comparing which is Superior for 3-Point Crutch Gait - ResearchGate, https://www.researchgate.net/publication/351955875_Axillary_versus_Forearm_Crutches_A_Prospective_Cohort_Comparing_which_is_Superior_for_3-Point_Crutch_Gait
- Forearm Crutches are a Better Option for Long Term Use ..., https://smartcrutch-usa.com/blogs/smartcrutch%C2%AE-enewsletters/forearm-crutches-are-a-better-option-for-long-term
- How To Choose & Use The Best Crutches For You - Performance Health, https://www.performancehealth.com/articles/how-to-choose-fit--use-the-best-crutches-for-you
- Forearm vs Underarm Crutches - Which is Better? - smartCRUTCH USA, https://smartcrutch-usa.com/blogs/news-and-faqs/forearm-vs-underarm-crutches-which-is-better
- MAKE SURE YOU HAVE CRUTCHES THAT FIT PROPERLY, https://ace-pt.org/make-sure-crutches-fit-properly/
- Crutches 101: Everything You Need to Know - Twin Cities Orthopedics, https://tcomn.com/crutches-101-everything-you-need-to-know/
- How to Fit Your Crutches - YouTube, https://www.youtube.com/watch?v=Tsot5eVgbCo
- Check the assistive device (e.g., cane, walker, crutches) to determine the maximum weight limit; if necessary, provide patie, https://nursing.cuanschutz.edu/docs/librariesprovider2/covid/review_-crutches-canes-and-walkers.pdf?sfvrsn=333703b9_0
- Measurement, fit, and ambulation with crutches - YouTube, https://www.youtube.com/watch?v=xw11at9sbSM
- myhealth.alberta.ca, https://myhealth.alberta.ca/Health/Pages/conditions.aspx?hwid=custom.ab_physio_crutches_inst#:~:text=Make%20sure%20the%20crutches%20fit&text=The%20crutches%20are%20the%20correct,down%20on%20the%20hand%20grips.
- Axillary/Forearm Crutches - CONNECTICUT VALLEY HOSPITAL, https://www.cga.ct.gov/ph/tfs/20190426_CVH%20Whiting%20Task%20Force/20190617_CVH%20Policies%20and%20Procedures/4%20Crutches.pdf
- Crutch Fitting - YouTube, https://www.youtube.com/watch?v=OVaImhnTKKE
- Forearm Crutches (Elbow Crutches) - Gov.bc.ca, https://www2.gov.bc.ca/assets/gov/people/seniors/health-safety/pdf/forearm_crutches.pdf
- How to Adjust Forearm Crutches: 7 Steps (with Pictures) - wikiHow, https://www.wikihow.com/Adjust-Forearm-Crutches
- 6 Tips for the Correct Use of Forearm Crutches - Essential Aids, https://www.essentialaids.com/blog/6-tips-correct-use-forearm-crutches.html
- How to Walk with One Crutch! - YouTube, https://www.youtube.com/watch?v=uOFG7_8L69Y
- How to Walk With One Crutch: 6 Steps (with Pictures) - wikiHow, https://www.wikihow.com/Walk-With-One-Crutch
- Using Crutches - Overview, https://www.cham.org/HealthwiseArticle.aspx?id=zt1155
- After Hip Replacement: Using Your Crutches or Cane | Saint Luke's ..., https://www.saintlukeskc.org/health-library/after-hip-replacement-using-your-crutches-or-cane
- Using Crutches: Up and Down Steps | Saint Luke's Health System, https://www.saintlukeskc.org/health-library/using-crutches-and-down-steps
- After Knee Replacement: Walking With Crutches | Saint Luke's Health System, https://www.saintlukeskc.org/health-library/after-knee-replacement-walking-crutches
- How to Use Crutches on Stairs, Through Doorways, and In and Out of Cars - Health Library, https://healthlibrary.uwmedicine.org/MultimediaRoom/VideoLibrary/VideoTranscript.pg?e=0&player:138,K1953
- How To Carry Things With Crutches, https://kneecrutches.co.uk/how-to-carry-things-with-crutches/
- No weight bearing crutch walking (1526) - Children's Wisconsin, https://childrenswi.org/publications/teaching-sheet/pt-ot-new-berlin-pt-ot/1526-no-weight-bearing-crutch-walking
- How to Properly Use Crutches after Joint Replacement Surgery | SHHC Blog, https://www.shhc.com.au/blog/statewide-home-health-care-blog/statewide-home-health-care/how-to-properly-use-crutches-after-joint-replaceme/
- How to Walk With Crutches Correctly (Non-Weight-Bearing) - Froedtert, https://www.froedtert.com/videos/how-walk-crutches-correctly-non-weight-bearing
- How to Walk with One Crutch, https://kneecrutches.co.uk/how-to-walk-with-one-crutch/
- Forearm Crutches vs Freedom Leg Hands Free Crutch-Which is the ..., https://www.freedomleg.com/blogs/news/freedom-leg-hands-free-crutch-vs-forearm-crutches-which-is-the-best
- Why is the iWALK 3.0 Hands-Free Knee Crutch better than others? - YouTube, https://www.youtube.com/watch?v=QXKkH6fXy3Y
- Household safety checklist for senior citizens - Mayo Clinic Health ..., https://www.mayoclinichealthsystem.org/hometown-health/speaking-of-health/household-safety-checklist-for-senior-citizens
- A Home Safety Checklist For Hospice Patients, https://www.coastalhospice.net/blog/a-home-safety-checklist-for-hospice-patients
- Aging in Place Home Safety Checklist - DME Elevators & Lifts, https://www.dmelift.com/aging-in-place-checklist/
- Exercises for upper-body strengthening when using crutches - little growing bones, https://littlegrowingbones.com/exercises-when-using-crutches/
- Upper Body Exercises Before Surgery or Procedure- Help with ..., https://www.saintlukeskc.org/health-library/upper-body-exercises-surgery-or-procedure-help-walker-or-crutch-use
- 10 Core Exercises for Seniors to Build Strength, Posture, and Independ– Carex, https://carex.com/blogs/resources/core-exercises-for-seniors